Tuesday, March 8, 2016

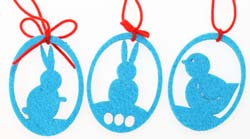
Lasercut felt easter decoration

Easter is around the corner and you do not have any decoration? No problem, it only takes two minutes to make this Easter craft with a Trotec laser!


Required material
§  Felt in any color with 622 g/m² 
§  some ribbon


Suitable laser machines:
Speedy 100, Speedy 300,
Speedy 400, SP500

Trotec laser used:
Speedy 400, 80 watts, 2.0 inch lens


Step 1: Design and text
We designed an Easter basket and filled the remaining felt with Easter eggs for hanging, making the most out of the material. 
You can also personalize the Easter basket with the name of the person you want to give it and make the decoration out of various colors of felt.
If you don't want the Easter eggs for hanging, you can create other decorations like napkin rings or flowers to maximize the material use... Feel free to be creative!


Step 2: Laser Settings
Send the file with your personalized Easter elements to the laser.
We have worked with a Speedy 400 with 80 watts laser power and used the following parameters:
Engraving: Power: 33% - Speed: 50% - Frequency: 500 ppi - Air Assist: ON - High Quality
Cutting: Power: 40% - Speed: 2% - Frequency: 1000 Hz - Air Assist: ON
Cutting-in: Power: 10% - Speed: 2% - Frequency: 1000 Hz - Air Assist: ON

It only takes two minutes to make these with the laser!


Step 3: Tie it together
​When the laser is finished, remove the material from the laser, tie the basket with a ribbon together at each end, and attach ribbons to the hanging decoration.

Step 4: Decorate and make presents!
Use these items to decorate your home, your office, or fill the baskets with eggs and candy to make someone an Easter present.

Tips:
§  Weight the felt in your laser and use the Air Assistent that the felt is flat.
§  If you use a Speedy 300 flexx with 80 watts you should raise the power up to 45% and use a 2.5 inch lens. 
§   You can also cut and engrave Easter decorations out of wood and with the Speedmarker GS you can engrave colored Easter eggs in just a few seconds!


That could be also interesting:


We designed an Easter egg with ornaments and the German wish "Frohe Ostern" for "Happy Easter".
You can write other sayings, or the name of the person who you want to give this wooden decoration as an Easter present. Feel free to change the template which we've uploaded for you.

For more information and .pdf laser cutting files please click the following link : http://www.troteclaser.com/en-US/Laser-Samples/Textile/Pages/felt-easter-craft.aspx


Sunday, March 6, 2016

Finished church architecture model


final preparations 


Orthodox church model by Kostel Shekutkovski 
design of parts and spatial concept of model at Laser Cut Design Laboratory 
model has been produced by a combination of laser cut and 3d printing techniques

for more info on creating your models at our studio 
please contact us via: 
asekutkovska ( @ ) gmail.com 


Thursday, February 18, 2016

Laser croquis


Oftentimes I feel like I am drawing with the laser..

Wedding invitations can model and transform the whole character of your celebration.They are a significant part of the carefully crafted design for your special day. In our studio we are exploring possibilities of creating hand drawn sketches translated into laser cut paper to match the conceptual story line of your special day. Detail of a wedding celebration planning in progress. 

Tuesday, February 9, 2016

Flux:love


I was always intrigued by this idea of creating the possibility to wear the observations and sensations of the city in a fashion accessory: object: necklace.
When one of my clients approached me to create a custom made necklace I was once again caught in the sketches of my current research focus. The dynamics of movement and the creation of wholeness were the main principles from which I wanted to shape the form and expression of the statement necklace. Two flows that come together creating and existing between actions: reaction are what I tried to express through this custom made necklace that I called simply Flux: love.
Similarly to the urban tissue of Bangkok where I am living, the weavings and intertwined flux realities and illusions are directly portrayed in a wearable urban diagram of the city’s structures and scenarios.


Monday, February 1, 2016

Wedding celebrations *•.¸¸.•*´¨`*•.

Invitation via: Not on the High Street 
delicate & elegant 

Wedding celebrations can become unique opportunity to create your favorite laser cut ideas. The next period in Laser Cut Design Laboratory we are dedicating our energy to special laser cut wedding gifts, invitations and fashion accessories. We will be also sharing a lot of projects by fellow studios with different kind of concepts. 

Would you like to share some of your favorite laser cut wedding inspirations with us ? 

Tuesday, January 26, 2016

We ♥ The laser cut record


Joy Division - Love Will Tear Us Apart - Laser Cut Acrylic Record from Amanda Ghassaei on Vimeo.

This project has literally won our hearts. It is conceptual and ingenious and reminds us of the sound we hear perpetually when we are trying to laser cut on our machine, we were always intrigued by the variety of sounds our machine creates when it laser cuts a certain material. 

Following the link you can find more information and instructions on how to create your very own laser cut acrylic and wooden record. 

Friday, December 25, 2015

Festive Cupcake or muffin Case guest post for Trotec lasers

This tutorial shows you how to laser engrave and cut a muffin or cupcake case created from TroLase Thins.
Follow our simple tutorial, which also has the option to change the size of the graphic or use different material colours. The finished product can be also used for cupcakes or as a festive decoration around a candle in a glass.​


​​​​​​​​​​​​​​
Required material

TroLase Thins Port Wine / Gold (0.5mm thick)

Trotec laser used: 


Speedy 300, 80 watts, 2.0 inch lens


Step 1: Design


Create the graphic in a graphics program or import our template. The parcels are defined as engraving areas by the black fill, snow crystals and border lines must be defined as cutting lines (width: hairline; R: 255; G: 0 B: 0). Additionally, you can add text at the bottom of the graphic for a personal touch. 


Step 2: Bend graphic

To bend the strip later to a muffin case, bend the graphics in Adobe Illustrator with the warping tool or in Corel Draw with the tool 'Envelope' (menu: Effects > Envelope > Simple arc > putty). Hold Ctrl and then drag the lines to the desired arc.​


Step 3: Settings


We worked on a Speedy 300 (80 Watss power) with the following parameters:
Cutting: power: 300% - speed: 1.5% - frequency: 1000 Hz- air assist: ON 
Engraving: power: 70% - speed: 80% - frequency: 500 ppi - air assist: ON - Z-Offset: 1mm - high quality: ON 
In the menu plate setup, choose start position bottom. Remove protection foil from the laminate and check the vacuum. Focus the laser and off you go!  


Tips & Tricks
§             ​Consider the cutting sequence: The cutting lines are considered bottom up in the production process. Therefore, place the outline at the top position in Corel Draw Object Manager.
§             For an increased vacuum cover unused parts of the table with paper.
§             Select the engraving start position as 'bottom'. This prevents deposits from setting on engraved areas which could discolour the product.
§             First clean with a damp cloth then dry, preferably still in the machine.
§             If colour residues are present, check the parameters, focus and check the rest of the laminate on the table.​​


Friday, October 23, 2015

Translating laser cut concepts into silver


Last month I had the opportunity to attend a workshop at Atelier Rudee in Bangkok, Thailand. 
It was a very interesting experience, I was trying a new technique making models from wax and later on casting them into silver. Since I already had sketches from my Thailand-Cambodia trip I was translating my concepts by using a cutter for the wax sheets , thinking about geometry, layering and construction. 

I really like the way that you create something from such a fragile and sensitive material as wax, and later on it just melts guiding the warm silver to fill all of the contours. I was very surprised by the accuracy of this method, miniature details made on the wax pieces are present once the designs are casted in silver. You can even notice your fingerprints in some parts.

In the end I got two rings casted into silver. Hope you enjoy my concepts and designs. 


Wednesday, October 21, 2015

Jack-o-Lantern for Halloween guest post for Trotec Lasers

Create a unique Jack-o-Lantern for Halloween


​​​​​​​​​Nothing signifies Halloween like a glowing Jack o'Lantern with a unique pattern. In this tutorial we show you how to create a unique Halloween pumpkin using a laser.


Required material  
- pumpkin
- pumpkin carving kit or sharp knife and  large spoon or ice cream scoop
- duck tape 
- tooth brush
- a candle or LED lights

Trotec Laser Used:
Speedy 400, 80 watts, 2-inch lens

Step 1: Find a perfect pumpkin

Buy a pumpkin from your local supermarket or from a farm shop. Try to find one that's a good size with little visible damage/marks. The perfect pumpkin has a smooth surface and a uniform coloring.

Step 2: Place the pumpkin in the laser

Put the pumpkin in the laser and position it with some tape, if necessary.
Open our template or design your own pattern, and then send the file to the laser.
(http://www.troteclaser.com/en-US/Laser-Samples/Promotional-Items/Pages/halloween-pumpkin-laser-engraved.aspx) 

​Parameters used:
Engraving: Power: 100% - Speed: 25% - Frequency: AUTO - Air Assist: ON - Passes: 2
For a perfect engraving result, we've activated the "High Quality" option.


Step 3: Wash it
After processing it with the laser, it is necessary to clean the pumpkin with lukewarm water and a toothbrush.


Step 4: Prepare tools

Take a sharp knife and a spoon. You will also need 2 bowls - one for the seeds and the other one for pumpkin pulp. 


Step 5: Hollowing
Cut out the lid at the top of the pumpkin and take all the seeds and the pumpkin strings.You can use a spoon, but it is easier just using your hands.

After that  use a spoon to clean out the inside of the pumpkin. Scrape away the walls and put the pumpkin pulp into the second bowl.


Step 6: Let it glow
Wipe the inside of the pumpkin down with a kitchen sponge. Place a candle or a LED-light inside the pumpkin and close the lid. Now your Jack o' Lantern​ is ready for Halloween!


Happy Halloween! 


Tips and Tricks:

Sprinkle some cinnamon on the underside of the lid. Some people claim this makes the pumpkin last longer.

Hollowing out the pumpkin can be quite exhausting. An ice cream scoop can make your job easier.​
Don't throw the pumpkin pulp away - keep it and cook a delicious soup​.

Design .pdf and Job control guidelines can be found at : http://www.troteclaser.com/en-US/Laser-Samples/Promotional-Items/Pages/halloween-pumpkin-laser-engraved.aspx


Monday, October 19, 2015

Story 7 : Fitting all parts together to get the final model

It has been a while since we posted the sequence story of the church model we have been working on.

Please find more pictures from the sequence story No.7 where you can see how the whole envelope of the church is coming together with the external, internal walls and the roof structure is "waiting" for the final touch.


A dash of Minimal chic: On outfits, exhibitions & invitations - Featuring The Paperless Post

featuring Oscar de la Renta cards design for Paperless post  https://www.paperlesspost.com/cards/group/oscar_de_la_renta Oh, the sme...