Thursday, August 17, 2017

A dash of Minimal chic: On outfits, exhibitions & invitations - Featuring The Paperless Post

featuring Oscar de la Renta cards design for Paperless post https://www.paperlesspost.com/cards/group/oscar_de_la_renta

Oh, the smell of the in-between of a jewellery collection finish and an official presentation: can you recall, the scent of the creative force, the importance of the packaging and display, the chit-chats with the customers, friends, acquaintances? 

Every collection we create is backed up by a professionally custom made event-presentation. Since we consider our jewellery collections to be precisely in the art business  we always celebrate a new collection with an exhibition format display. Minimal interiors, jewellery as an oufit-object, a dash of delicately handmade wardrobes, drinks, petite food, invitations. We like to think of exhibitions in terms of atmospheres and rituals creation. That approach is what I believe makes the whole event true to the creation. 

In this post I decided to share with you a little on our secret to-do lists when we are preparing an event to showcase our new jewellery. These tips assemble what I like to call the Manifesto of the Minimal Chic event planner, including the 4 crucial aspects: The Interior, The Outfit, The handmade drinks and The Invitations.

featuring Kate Spade cards design for Paperless post 

1. The interior-Creating the Atmosphere 

The Interior serves as your spatial geography, it creates the whole atmosphere of the event, collection, beginning of the story. First of all think simple, you don't want the interior itself to dominate the display of the exhibition. Second, think of places alternatives, not just the regular exhibition spaces, but rather contextually. Pop up installations can allow you to develop a concept in a context. Or in the words of the great architect Peter Zumthor: 
"Every time I imagine a garden in an architectural setting, it turns into a magical place. I think of gardens I have seen, that I believe I have seen, that I long to see, surrounded by simple walls, columns, arcades or the facades of buildings - sheltered places of great intimacy where I want to stay for a long time."

2. The Invitations that sound like Handmade 

When it comes to paper, I am completely old-fashioned. I like to read my books in hard copy, to go through my magazines page by page, to receive invitations that I can feel, which still communicate in a magical, nostalgic and yet modern language. Yes, that may surprise you as I am known as the laser-cut diva, however I prefer handmade to digital. It has been a personal quest of mine to find the option to choose between paper and digital-that feels like handmade, like paper. And I have the perfect place for you on this topic, it is called Paperless Post. Their exquisite, simple and beautiful card design solutions offer you a feeling of handmade, providing you the opportunity to create a card for your clients, friends, acquaintances, family and give them that warm feeling that a design was made especially for them. They have perfect solutions to give an introduction to the atmosphere of your event and even resurrect the ritual of the invitation-giving. Offering wonderful possibilities for customisation in most of their design you can choose your preference between chocolate and vanila that is digital or paper. 
Indulge in these beautiful card designs for your events at Paperless Post 

featuring Cards for Party and Entertaining 

3. The handmade drinks

Lemonade, home made fruit liquor, natural sirup, half-sorbets- conceptualising the drink-desert-petite menu is also a story by itself. In this direction I like to think of hand made, natural, organic and colour coded drinks. And of course the appropriate glasses. No plastic. No unsuitable forms for the appropriate drink. Research and experimentation before are warmly recommended since the drink can also become an important ritual of the event (be careful not to over do it, it should compliment and not take over). Check the link for my personal favourites : https://www.pinterest.com/aleksandrasheku/exquisite-drinks/


4. Wearing jewellery as an outfit 

While I am always taking time to assemble my looks for the exhibition opening from shoes, dress, mood, perfume, I always remain true to the jewellery piece I have chosen to wear. In a way it dictates everything else that will accompany it. In this sense I like to choose the most bold, radical and curious pieces of the collection. These intricate jewellery pieces  display a distinguishable narrative creating powerful multilayered impressions and possibilities to communicate the context of new cartographies and atmospheres. 

Would you like to share with us some of your approaches, atmospheres and rituals when preparing for an event ? 

This article is written on behalf of Paperless Post. Find out more about our sponsored content options at asekutkovska(@)gmail.com. 


Friday, June 30, 2017

Designing for the Future: Trends we need to consider now: The Ideal Dialectics


The combination of dialectics between technology and hand-work will inevitably become a trademark, a distinguishable authenticity stamp on design products of the forthcomings. Future trend development will consider as valuable, those products that create a synthesis between advanced technologies and hand-work. Too often nowadays the conceptualisation, design process and manufacture have been opposed, either by countless repetition of the variation of one particular design, or the strict separation between hand work, design thinking and technology design thinking. In further discussion, authentic design products carry concepts which are able to be scaled up and down: from the smallest scale product, to architecture, up to the biggest scale - the city. Therefore these design concepts should embrace attempts to carry conglomerates of the technology-handmade dialogues. We propose 3 scenarios for Future Design development based on the architect Oswald Mathias Ungers, and his work “The Dialectical City”: Supplementing, Complementing and Superimposing the Ideal Dialectics into the design product of the future.


1.SUPPLEMENTING tactics will consider the level of readability of the designer’s sketch, drawing, diagram idea, ideogram. The readability of this into the finalised product will distinguish the product in a valley of ready made vector files. Translating the hand work into a digitalised technologically manufactured work is a dialectic by itself. On another hand it will set a “different” value of the design product, embracing the strength to influence other designs, processes and techniques. In our studio we have done the tactics of supplementing quite literally. The sketches have been 80% transformed and translated into the design product, which was later manufactured by the latest technological processes. 


2.COMPLEMENTING While building architectural models we would often experience the triangulation between techniques of 3d printing, laser cutting and hand finished details. The hand finishing of the details, as an embrace of a “vintage” craftsmanship has applied new meanings to the finalised product. The layering of the possibilities of technologies and handmade into the manufacture of the product is yet another dialectic which will make a future contemporary design distinguishable, determine a higher price, and offer a careful curation of design concepts.


3.SUPERIMPOSING The development of new materials for design products will also rely on the strategies of Complementing and Supplementing. We propose mixing and constructing dialectics: producing hand made materials that could be laser-cut, constructing materials by 3D printing and with hand finished details, sketching directly on materials.. the possibilities are many. 

Embracing the dialectics of the hand-made with the technological development into the design product, isn’t just a trend, it is a careful curation of the design essence inside an over-saturating field of design possibilities. 

Aleksandra Shekutkovska Dokoska 


                                                                                Images and text are courtesy of Aleksandra Shekutkovska Dokoska***


Monday, January 16, 2017

Trotec Lasers DIY project : Paper Ceiling Lamp

Take a simple bulb holder and produce great ceiling lamp.


Preparation

Required material:
Photo cardboard or thick paper (approx. 180 - 300 g/m²)
IKEA bulb holder (cord set) HEMMA with LED bulb
Material to cover the engraving table (e.g. paper)

Machine used:
Trotec Speedy 400
120 Watt

Tips:
Use a cutting table (honeycomb or acrylic grid) for best cutting results

Use a 1.5 inch lens


Step by Step


Step 1: Import /create design template
Import our design templates into your graphic program and adapt it to the size of your lamp shade. Send it to the laser with the recommended laser parameters. The parameters might vary depending on the machine used and the available laser power.

TIP:
Once you have positioned your paper into the laser machine, switch on the exhaust and cover the rest of the table with white paper to increase the exhaust performance.


Step 2: Laser Process
Cut out the design from the paper. For the bulb holder you will need 5-6 paper stripes.

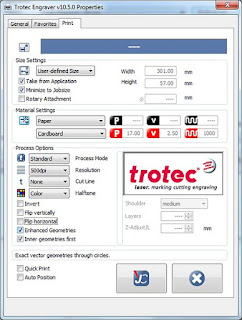
LASER PARAMETERS:
power 17%
speed 2.5%
frequency 1000 Hz
Air Assist on
TIPS:
Select these two options in JobControl® to get perfect cutting results.
Optimized geometries
Inner geometries first


Step 3: Assemble your lamp
Put the laser cut paper strips on the bulb holder. Then put the opposite holes on the holder. Fix it with the carrier ring.

Important:
Only use a LED bulb
Make sure to have enough distance between the bulb and the lamp shade


Downloads


More info, tutorial and templates can be found at the following link :

Sunday, December 25, 2016

Trotec Lasers DIY projects : Lasercut and engrave decorative Christmas trees


Preparation

Big Christmas Tree:

  • Required material: 5mm corrugated cardboard
  • Trotec laser used: SP500, 200 watts

We used a SP500 to cut our Christmas tree and 5 pieces 1300 x 750 mm cardboard.  You can customise the design of the tree according to your wishes - let your imagination run wild! After cutting out the parts you need to put them together. This guide shows them how to assemble the tree.


Small decoration tree:

  • Required material: 2mm corrugated cardboard
  • Trotec laser used: Speedy 300, 30 watts, 2.0 inch lens

This small Christmas tree is made of two parts that fit together. You can choose the size of the Christmas tree. (Our trees on the photo are 12 cm high.)

After cutting out the parts you need to put them together. This guide shows them how to assemble the tree. 


Once it's finished, you can decorate the tree with ornaments or garland of your choice.


Step by Step


Step 1: Big Christmas Tree

We used a SP500 to cut our Christmas tree and 5 pieces 1300 x 750 mm cardboard. You can customise the design of the tree according to your wishes - let your imagination run wild!
After cutting out the parts you need to put them together. This guide shows them how to assemble the tree.


Step 2: Laser Parameters for the big tree (5mm cardboard):

LASER SETTINGS
Cutting: Power: 85% - Speed: 2% - Frequency: 5000 Hz - Air-Assist: ON - Z-Offset: -1.5

TIP:
The tree is connected without any glue or hooks, so  you can take the parts apart again and use the tree for next year.


Step 3: Small decoration tree
The tree is connected without any glue or hooks, so  you can take the parts apart again and use the tree for next year.


Step 4: Laser Parameters for the small tree (2mm cardboard)

LASER SETTINGS
Engraving: Power: 40% - Speed: 100% - Frequency: 500ppi - Z-Offset: 6mm -Air-Assist: OFF
Cutting: Power: 20% - Speed: 1% - Frequency: 1000 Hz - Air-Assist: ON

TIP:
Use the vacuum table with the honeycomb table top for cutting and engraving the cardboard.


More info, tutorial and templates can be found at the following link : 
https://www.troteclaser.com/en-us/knowledge/do-it-yourself-samples/christmas-tree/

Wednesday, November 16, 2016

Custom made brooch for Johnnie Walker


In our latest work we custom made this laser cut and engraved brooch 
for the brand Johnnie Walker. 

We used wood and black acrylic to stay true to the character of this brand. 

How do you find our solution ? 

Tuesday, November 15, 2016

Trotec Lasers DIY projects: Perpetual calendar of wood and engraving plastic


Offer individual perpetual calendars of wood and engraving plastic.


Preparation

Required material:
Veneer Bamboo 3 mm (119799) - 1 sheet for the back
TroLase 0,8 mm (L204-203) - 4 quarter sheets for the calendar sheets
Screws (diam. 5 mm, 20 mm long) with butterfly nut - 2 pieces

Machine used:
Trotec Speedy 360
80 Watt with 2" lens

Tip:
Use a honeycomb cutting table


Step by Step


Step 1: Import /create design template

Import our designs into your graphic program and adapt it according to your requirements.


Step 2: Laser process
Position the material into the laser engraver and cover the rest of the engraving area for optimum exhaust performance. Send the wood laser job  and then the four TroLase jobs to the machine.

LASER PARAMETERS WOOD:
500 dpi resolution
Cutting: 100 % power, 0,7 % speed, 1000 ppi, air assist on

LASER PARAMETERS TROLASE: 
500 dpi resolution
Engraving (black): 35 % power, 30 % speed, 600 ppi, air assist on, z-offset +1mm, HQ mode (advanced material settings)
Cutting (red): 2,5 % power, 0,5 % speed, 1000 Hz, air assist on, z-offset +2mm
Cutting (blue): 25 % power, 2 % speed, 1000 ppi, air assist on, z-offset  +2mm
Cutting (cyan): 50 % power, 2 % speed, 1000 ppi, air assist on

TIPS:
Select the following options in JobControl® to get perfect cutting results.
Optimized geometries
Inner geometries first
Engraving from bottom to top reduces the cleaning of the engraved and cut materials


Step 3: Post-processing
Once you have finished the laser process, clean TroLase material with water. Then use two binding screws to fix the calendar sheets and mount the calendar to a wall.

Follow this link for more information on downloading .pdf files and job control instructions

On more information on Best Christmas Lights for 2017 check the following link :
https://laserchristmaslightshq.com


A dash of Minimal chic: On outfits, exhibitions & invitations - Featuring The Paperless Post

featuring Oscar de la Renta cards design for Paperless post  https://www.paperlesspost.com/cards/group/oscar_de_la_renta Oh, the sme...